Maike Epperlein, Alexander Schiebahn, Uwe Reisgen
Abstract
Resistance spot welding (RSW) pose a variety of challenges to users when joining modern aluminum alloys, especially when it comes to dissimilar joints between dissimilar joining partners. Despite the widely varying physical and chemical properties of die-cast and wrought aluminum alloys, mixed joints welded by RSW show mechanical joint properties that are 20 % higher than the minimum requirements recommended in currently valid standards. The research is focused on mixed joints between the die casting alloys EN AC AlSi7MnMg, EN AC AlSi9Mn and EN AC AlSi10MnMg T6/T7 in two-sheet lap joint combination with EN AW 6082 T6 and EN AW 5083 H111, respectively. The thermal conductivity of the joining partners has a decisive influence on the position and geometric formation of the welding lenses. The higher the thermal conductivity of the rolled alloy, the shallower the penetration depth of the welding lens on the rolled sheet side. However, the use of an electrode force profile with a dynamic increase in force can significantly improve the welding depth and, in particular, the reproducibility of the weld properties. At the same time, the solidification porosity detected in the center of the welding lens is significantly reduced.
1 Introduction
Resistance spot welding (RSW) is a pressure welding process in which electric current is introduced into the components to be joined via electrodes. The strongest heating and the formation of a lens-shaped connection (weld nugget) occurs in the joining plane in accordance with Joule's law. One of the main advantages of RSW is the short process time, which is in the three-digit millisecond range depending on the material combination to be joined. Together with a high degree of reproducibility, very good automation capabilities and the possibility of combining adhesives (hybrid joining), RSW is a popular process for joining thinner sheets (< 3 mm sheet thickness), which is particularly used in the automotive industry. A major challenge that RSW has to face is the substitution of steel construction components with aluminum components in the context of emerging lightweight construction strategies in recent years. In addition to process-related requirements, such as the higher current density required for the RSW of aluminum compared to the RSW of steel components (better electrical and thermal conductivity of aluminum), metallurgical challenges that are strongly dependent on the alloy continue to hinder the use of RSW for joining aluminum components. These include, among other things, a reduced electrode lifespan due to the formation of intermetallic phases between copper (electrode caps made of Cu alloys) and aluminum, e.g. Al2Cu, and consequently a loss of economic efficiency due to shortened rework intervals. But also the irregularities that occur as a result of metallurgical phenomena, such as hot cracking, which can significantly reduce the weld quality, favor the hesitant application of RSW for joining aluminum-mixed joints. However, in order to continue to be one of the joining technologies with a wide range of applications in major industrial sectors, the use of RSW for joining construction components in aluminum-intensive mixed construction is essential, so new concepts for increasing economic efficiency and process reliability are needed.
1.1 Connection-specific challenges
When welding dissimilar joints between aluminum die-casting alloys and aluminum wrought alloys, the different alloying concepts result in additional challenges that have so far largely prevented the use and validation of an RSW process for industrial applications.
These include:
- Compared to thin sheets the greater wall thicknesses of die-cast aluminum components and the resulting large overall joint thicknesses have to be joined with comparatively higher electrode forces, despite the limited rigidity of the system technologies used. [1...3]
- The different melting ranges resulting from the different alloy designs, as well as the mechanical-technological, chemical and physical properties, such as increasing electrical resistance with increasing Si content and the lower thermal conductivity of the Si-containing aluminum casting alloys. [4...7]
- The hardness profiles that occur in such dissimilar joints, with increased hardness in the weld and reduced hardness in the heat-affected zone, are not typical for aluminum. [8–10]
- The susceptibility of aluminum alloys to grain boundary melting and hot cracking due to large solidification intervals. [4; 6; 11; 12]
- A general susceptibility to weld porosity, especially in aluminum diecastings, both gas porosity (solubility jump for hydrogen in the aluminum solid solution during solidification) and solidification porosity (high shrinkage during solidification). [5; 13...16]
- Residual stress-induced distortion of components. [4; 6; 7; 17]
As part of the research project "Resistance Spot Welding of Die-Cast Aluminum Alloys and Wrought Aluminum Alloys" (01IF22700N), the suitability of RSW for dissimilar joints between silicon-containing aluminum die-cast alloys and aluminum wrought alloys of the 5000 and 6000 series in single-shear joints was investigated. The present article shows the great potential of aluminium mixed joints produced by RSW, but it also points out the technological progress in terms of process engineering that is needed for industrial implementation. This progress must be achieved in the coming years in order to keep pace with the modern joining technology challenges for achieving climate policy goals.
2 Methodology
Table 1 lists the material thickness combinations (MDK) considered, stating the respective rolled sheet thickness tw and cast part thickness tc.
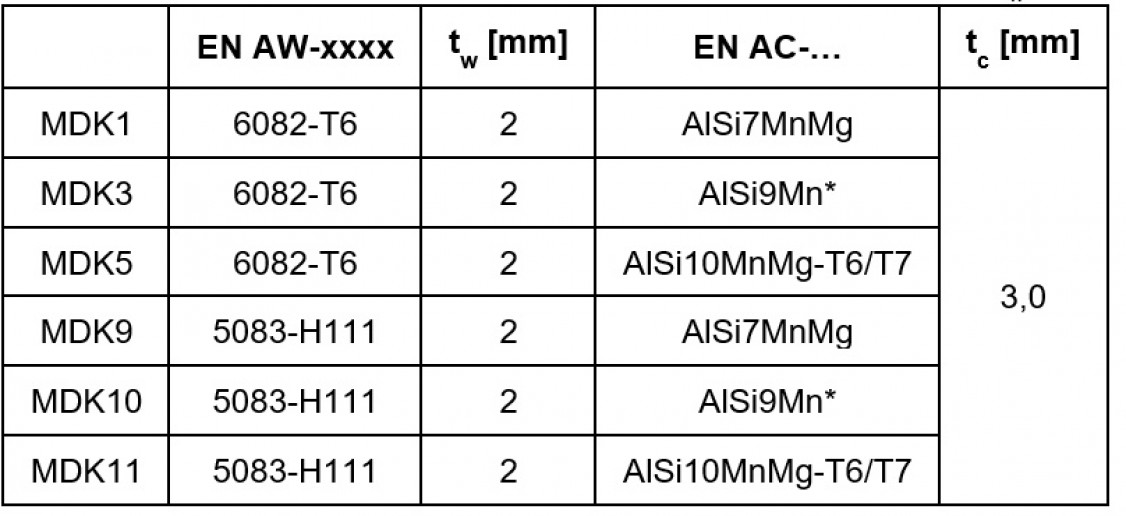
An EN AW 6082-T6 and an EN AW 5083 H111 in 2 mm are used as wrought aluminium alloy. The joining partners are the heat-treatable casting alloys EN AC AlSi7MnMg and EN AC AlSi10MnMg T6/T7, and the naturally hardened alloy EN AC AlSi9Mn. The aluminium casting alloys have a product thickness of approximately 3 mm. The test materials differ in terms of their chemical composition. Table 2 shows the different alloy compositions of the test materials according to the manufacturer's specifications.

2.1 Welding tests
A mid-frequency direct current (MFDC) welding machine in C-type-design from Nimak with servo-motoric force unit and electromagnetic follow-up unit (magneticDrive) is used for the welding tests. The nominal frequency of the inverter is 1000 Hz. Electrode caps of the type A0 20 R100 made of CuCr1Zr are used. [3]. These are milled on the system to the desired working surface radius (100 mm). To utilize the heat field displacement in the direction of the anode resulting from the Peltier effect, the rolled sheet is aligned on the anode side for all of the experiments presented here.
The welding current profile selected at the beginning is the standard welding profile according to VDA 238 401 [18] with a constant electrode force of 7.5 kN, a 100 ms long 8 kA strong pre-current, followed by a 150 ms long main current pulse with a current strength between 20 kA and 65 kA to achieve critical weld spot diameters. The critical weld spot diameters are dw,min = 4√t and dw,nom = 5√t. In this context, Imin is the current strength at which dw,min is achieved and Inom is the current strength for dw,nom. [18] Table 3 lists the Imin. and Inom. currents determined for the various MDKs.

3 Results and Discussion
In the following, the selected conventional approach according to VDA 238 401 [18] is compared with an alternative approach based on the previously obtained results, in which, in particular, the electrode force profile was modified in a targeted manner.
3.1 Conventional Approach
The weld lens geometry generated by RSW results from the physical properties of the joining partners involved in the material combination to be joined. Similar to the joining of dissimilar joints between austenitic and ferritic steels by RSW, the weld depth that can be achieved in the respective workpieces of the aluminium dissimilar joints correlates with the respective thermal conductivity of the joining partner. Figure 1 and Figure 2 show cross-sections of example joints (left) and the welding depth p determined in the cross-section in both joining partners for the different MDKs depending on the welding current strength IH, Table 3, with sample size n = 3.
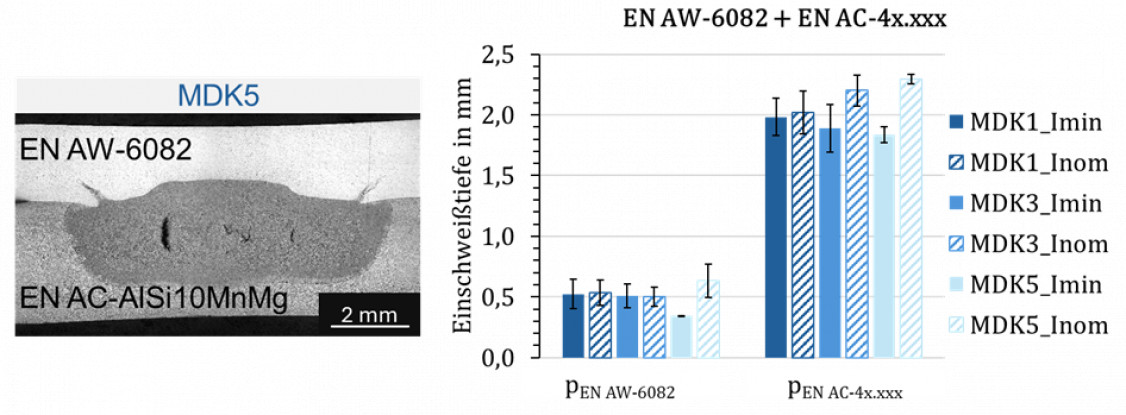
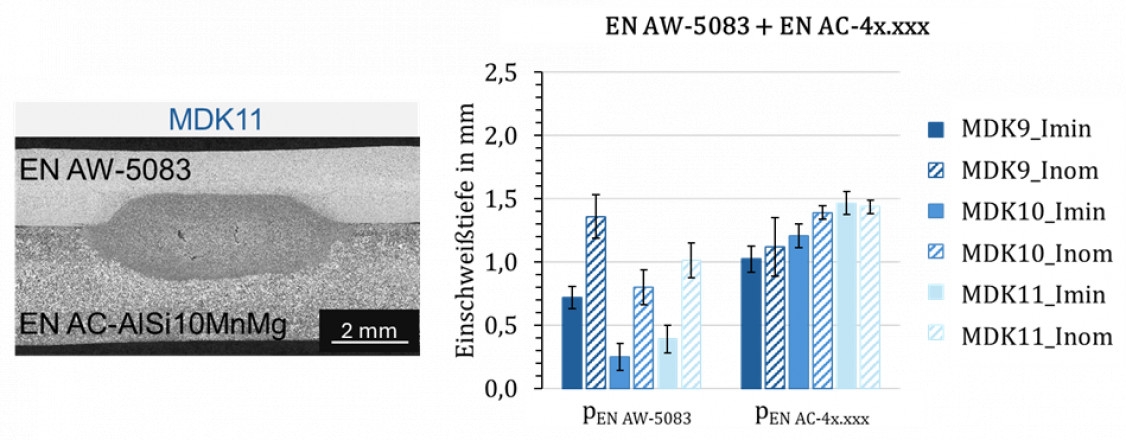
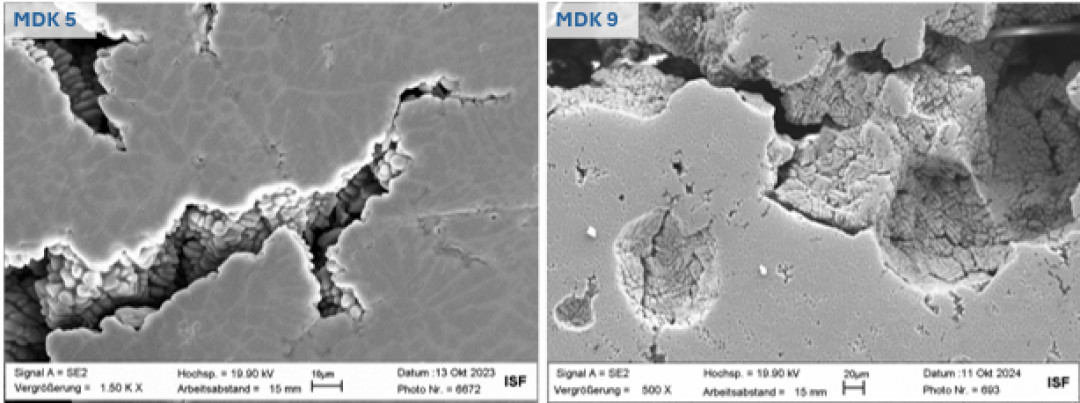
Due to the high thermal conductivity of EN AW 6082 (λ(EN AW 6082): 170 – 220 W/(m∙K)), the weld nugget is clearly shifted into the casting material in the case of MDK 1, MDK 3 and MDK 5 (e.g. λ(EN AC AlSi10MnMg): approx. 150 W/(m∙K), Figure 1). In contrast, for MDKs with EN AW 5083, the weld nuggets at IH = Inom are almost symmetrical, Figure 2. Here, the thermal conductivities are closer (λ(EN AW 5083): approx. 140 W/(m∙K)). At IH = Imin, the penetration depths pEN AW 6082 and pEN AW 5083 determined in the cross-section are not above the recommended penetration depth of at least 20 % (pnom = 0.4 mm, Figure 1, Figure 2). Furthermore, the weld nuggets have a porosity in the center, which is outside the joining plane in the case of MDK 5 due to the localization of the weld lens. In the case of MDK 11, on the other hand, the porosity is within the joining plane,Figure 1, Figure 2. Figure 3 shows SEM images of the volume defects detected in the center of the welding lens, using the example of MDK 5 and MDK 9.
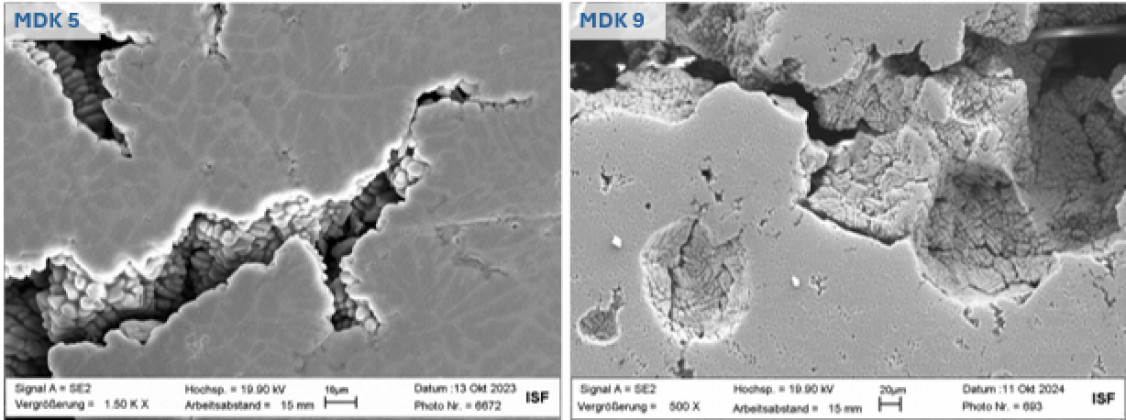
The detected porosity is mainly due to solidification, in which intact dendrites protrude into the the cavities. In MDKs with EN AW 5083, isolated pores with an approximately spherulitic shape and a flat surface can also be detected (Figure 3, right). This pore shape is typical of gas-related porosity. However, due to the cracks present in the pores, initial gas porosity is assumed, which is dominated by solidification porosity as solidification progresses due to the strong shrinkage of the melt.
Another significant difference between MDKs is the formation of cracks in the rolled plate-side HAZ. In the case of MDKs with EN AW 6082, these cracks are filled with material from the weld nugget. Figure 4 shows the results of an EDX mapping on MDK 5 with a higher silicon content of the material solidified in the crack lumen compared to the rolled alloy.
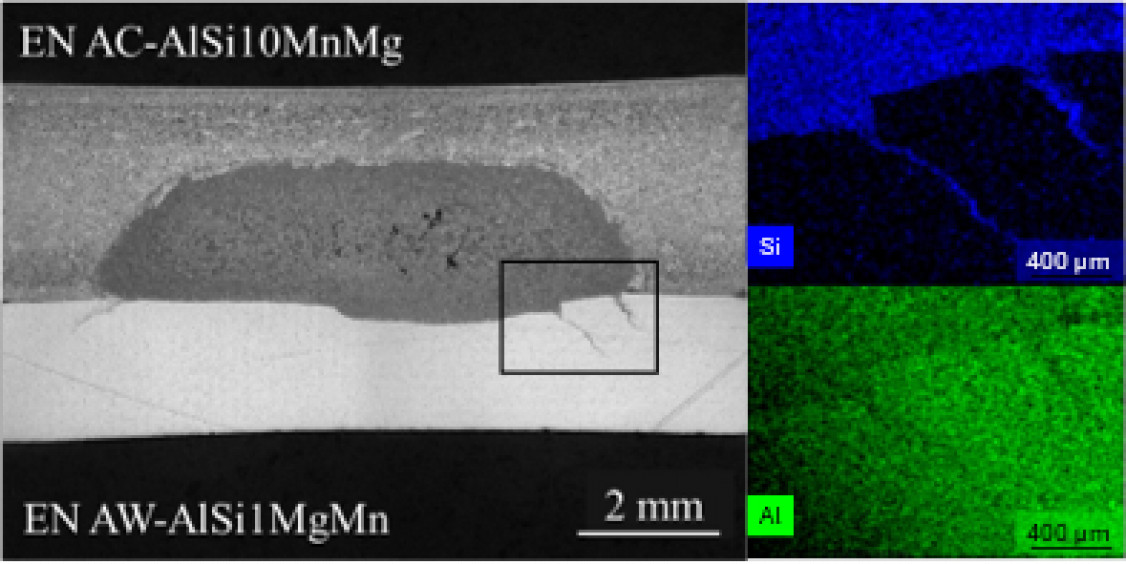
The cracks can be classified as liquation cracks. According to the current state of technology, this type of hot crack occurs as a result of melting in the presence of low-melting phases at the grain boundaries. These can occur with the additional local occurrence of thermomechanically induced tensile stresses. When in contact with the melt pool, the widened grain boundaries allow liquid melt to flow in, where it solidifies dendritically [6; 11]. In the case of MDKs with EN AW 5083, the corresponding cracks are not present to the same extent, Figure 2. Figure 5 shows the shear and cross tension forces determined for the different MDKs in quasi-static shear tensile test (STT) and quasi-static cross tension test (CTT).
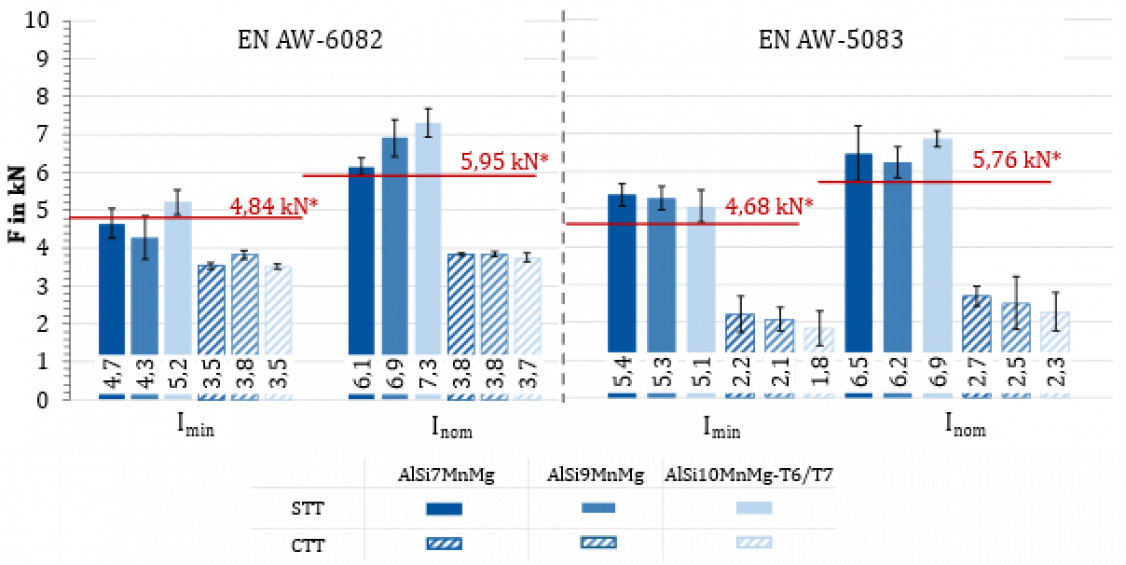
In particular, the maximum shear forces are up to 20 % higher for IH = Inom than the minimum shear forces recommended in DIN EN ISO 18595. By contrast, for IH = Imin, only MDK 5, MDK 9, MDK 10 and MDK 11 are above the minimum value of 4.84 kN, or 4.68 kN, Figure 5. The influence of the MDK on the joint strength under quasi-static cross tension loading is to be classified as marginal, apart from the larger standard deviation observed for MDK with EN AW 5083. The tendency for the cross tension force to decrease with increasing Si content of the cast alloy for MDKs with EN AW 5083 is not observed for MDKs with EN AW 6082. The different weld nugget geometries result in differences in failure behavior under quasi-static load. Figure 6 shows the different types of fracture and the characteristics of the heat-affected zones (HAZ) on the rolled sheet side, using MDK 5 and MDK 9 as examples.
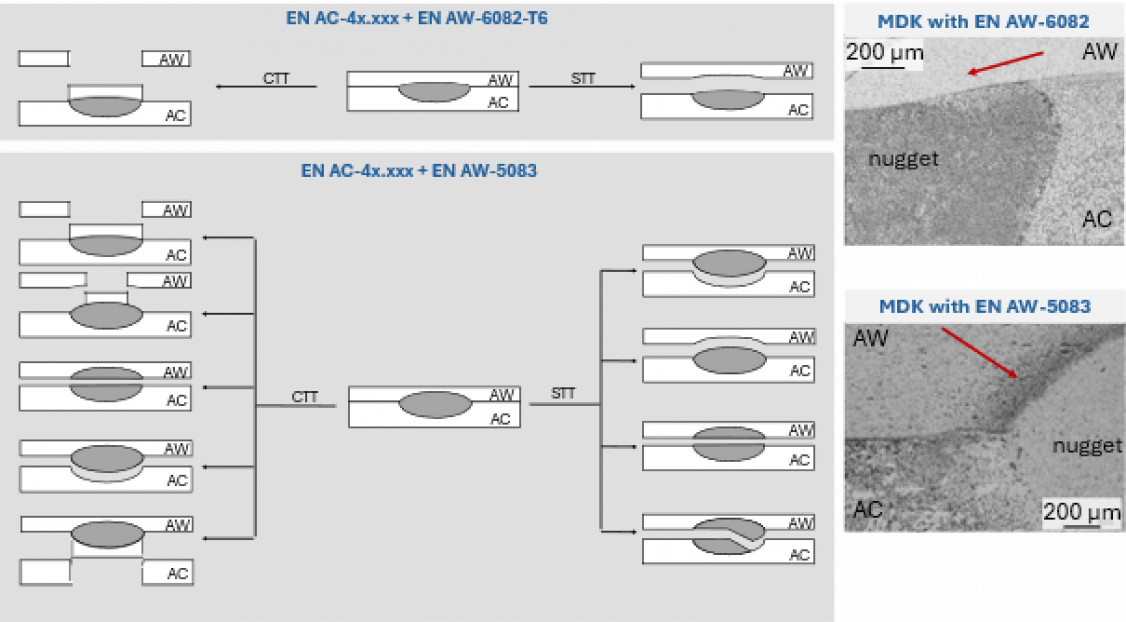
For MDK 1, MDK 3 and MDK 5, the failure in STT occurs exclusively along the hot-rolled sheet-side fusion line (lens interface fracture) due to the low weld penetration depth on the hot-rolled sheet side. MDK 9, MDK 10 and MDK 11, on the other hand, fail with different types of fracture, Figure 6. In addition to shear fractures running through the weld nugget along the joining plane, nugget interface fractures occur with failure along the fusion line, both on the rolled sheet side and on the cast part side, as well as a mixed form of shear failure and nugget interface fracture on the casting side. In CTT, button pull-outs occur throughout the rolled sheet in MDKs with EN AW 6082. In contrast, the fracture behavior in MDKs with EN AW 5083 is again alternating. Button pull-out fractures from one of the joining partners, both cast-side and rolled-sheet-side fractures along the fusion line, shear fractures with a fracture path through the nugget and mixed fractures occur. In case of mixed fractures, the failure begins along the rolled-sheet-side fusion line and transitions into a button pull-out fracture (residual fracture). As a result of the more even heat distribution that occurs in MDKs with EN AW 5083 when the heat conductivities of the joining partners are close together, a wide PMZ (partially melted zone) with signs of grain boundary melting forms on the rolled sheet side Figure 6. These are indicative of local process temperatures between the solidus temperature and liquidus temperature, i.e. above the melting temperature of low-melting phases located at the grain boundaries. The resulting cracks can be linked to the failure in the heat-affected zone near the fusion line. The strength of the base material and the weld bead exceeds the strength of the HAZ, where the cracks resulting from the melting of the grain boundaries further weaken the material cohesion.
In MDKs with EN AW 6082, on the other hand, this phenomenon is less pronounced, which, in addition to the alloy composition, is mainly due to the heat field being strongly displaced into the casting, whereby the melting temperatures of the phases located at the grain boundaries are only exceeded in a locally limited area. The failure of the MDKs with EN AW-6082 along the fusion line is due to the low welding depth on the rolled sheet side and the resulting stress increase (strength jump at the fusion line) positioned close to the main load plane. A direct influence of the filled cracks occurring in the HAZ of the EN AW 6082, Figure 4, on the mechanical properties under quasi-static loading could not be determined. Based on the results, an optimization problem can be derived in which the need for an overall lower heat input into the joints can be determined. On the other hand, a reduction in current strength is likely to result in subcritical welding depths. In addition, the need for higher welding depths on the rolled sheet side is offset by the resulting shift in the solidification porosity into the joining plane, which in turn increases its significance for the failure of the joint.
3.2 Modification of the electrode profile
To achieve an increase in the welding depth while simultaneously reducing solidification porosity, the electrode force profile is modified based on the process control used in the die casting process with a final repressing phase through a dynamic increase in force. Figure 7 shows the formation of welding lenses documented in cross sections during current shut-off experiments with dn and An as a function of the welding current time ti when applying a constant electrode force of F = 7.5 kN.
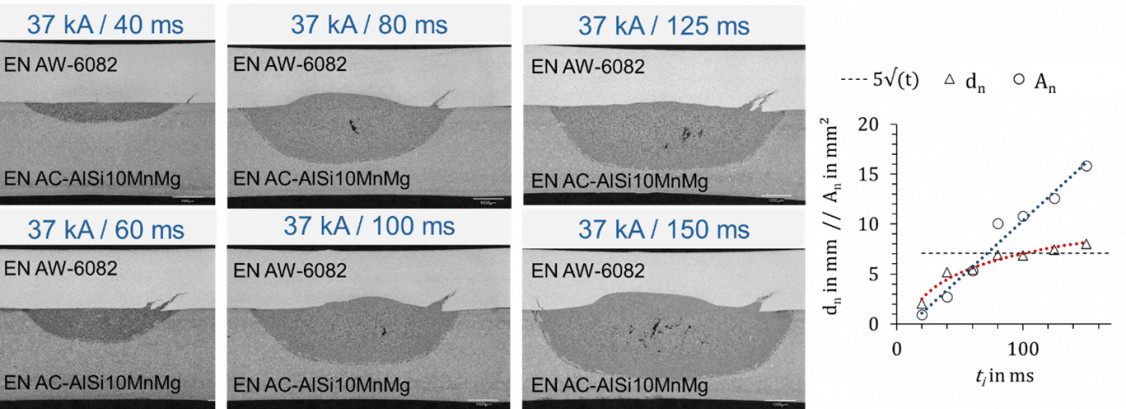
At the beginning of the welding process, the weld pool is only present in the cast workpiece and grows in the direction of the cast part thickness with increasing welding time. As the welding time increases, the welding depth into the rolled sheet increases, too, Figure 7. Liquation cracks can already be determined at an early stage of the RSW process (ti = 40 ms). The measurement of the weld nugget diameter dn and the weld nugget area An in the cross-section analysis shows a linear increase for An with a logarithmic increase for dn as the welding time ti increases. Due to the weld nugget porosity detectable in the cross-section from ti ≥ 80 ms, an increase in force from ti = 60 ms and after switching off the welding current, i.e. for compression, is selected. The previously determined time to realize an electrode force increase of 4 kN is 250 ms for the system used.
Figure 8 shows the achievable shear forces depending on the selected welded profiles in comparison to VDA 238-401. Figure 9 shows schematically the most expedient modifications of the electrode force profile (left) and the resulting welding lens shape, including the fracture types achieved after quasi-static shear loading (right).
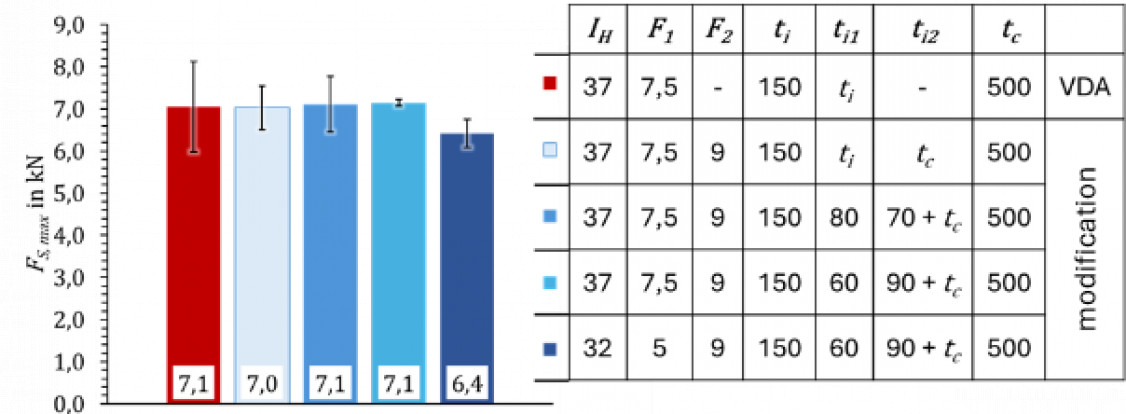
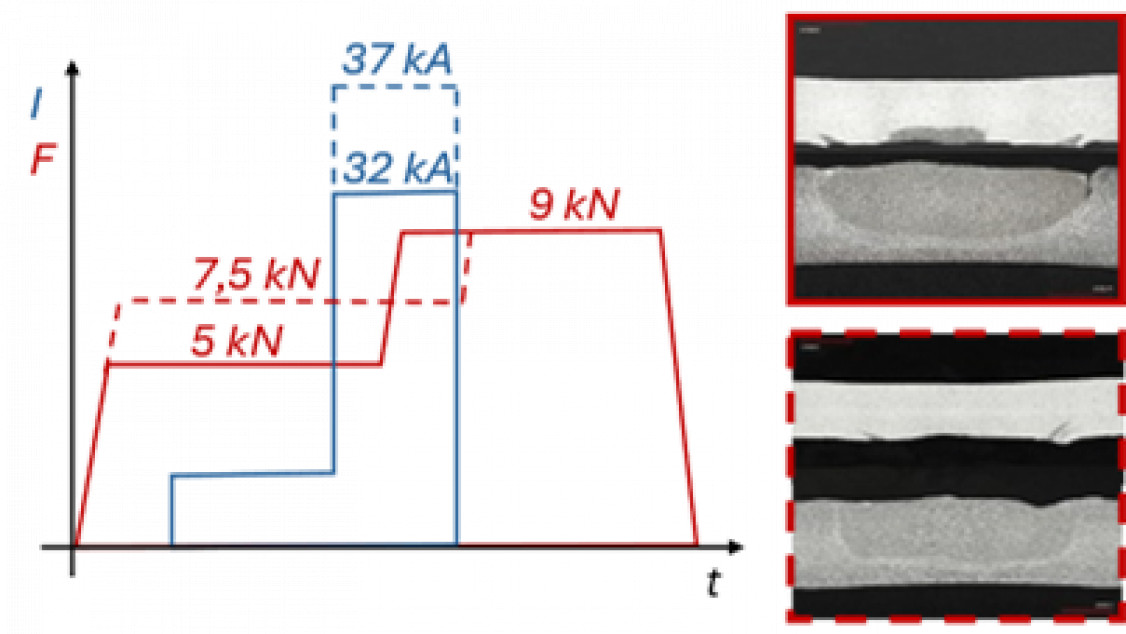
While the use of a force increase from 7.5 kN to 9 kN after switching off the welding current has no significant influence on the mean shear tensile force FS, max, this modification already leads to a significant reduction in the standard deviation, Figure 8. In the cross-section, a significant reduction in porosity can also be seen in the center of the welding lens, although no change in fracture behavior can be seen, Figure 9. With regard to the reduced scatter of measured values, it can be assumed that the repressing results in a more uniform hardening of the HAZ on the rolled sheet side.
On the other hand, greater welding depths in the rolled sheet can only be achieved by lowering the initial electrode force from 7.5 kN to 5 kN and initiating the increase in electrode force (to 9 kN) at ti1 = 60 ms. The resulting changes in contact conditions and the higher contact resistances at the beginning of the welding process enable a greater heat generation and thus greater welding depths. At the same time, the compressive forces exerted on the joint as a result of the dynamic increase in force counteract the tensile forces caused by solidification (due to the high shrinkage of aluminum). As a result, weld nuggets with sufficiently high penetration depths and reduced solidification porosity are formed. Although these can withstand comparatively lower shear tensile forces, they still exceed the minimum forces required by DIN EN ISO 18595 and lower standard deviations can be achieved, Figure 8 and Figure 9. A pull-out fracture in the wrought aluminum sheet does not occur.
4 Summary and outlook
The research project showed that the currently available recommendations for welding parameters for the RSW of dissimilar joints between aluminium die-castings and aluminium wrought alloys are only partially suitable due to the different properties of the alloys. The weld nuggets have an atypical geometry with centrally located solidification porosity. At a constant electrode force of 7.5 kN, the greater the difference between the thermal conductivities of the joining partners, the more the weld lens is displaced into the joining partner with the higher thermal conductivity. Consequently, for MDKs with EN AW 5083, a more symmetrical weld nugget with greater welding depth into the wrought aluminium results.
In the HAZ on the wrought aluminum side, MDKs with EN AW 5083 primarily show cracks resulting from the melting of the phases near the grain boundaries, which subject the mechanical behavior and the type of fracture with which a connection fails under quasi-static load to statistical scattering. In MDKs with EN AW 6082, liquation cracks dominate in the HAZ on the rolled sheet side, which are filled with solidified material from the weld nugget. No significant influence of the cracks on the mechanical connection properties could be demonstrated in the tests. The shear tension forces that can be achieved are up to 20 % higher than the minimum values recommended in actual standards. Nevertheless, the weld nuggets do not meet the current geometric requirements, particularly with regard to the welding depth in the rolled sheet and the occurrence of cracks in the HAZ.
A key factor influencing the quality of the weld spot is the choice of electrode force profile. The use of electrode force profiles with a dynamic force increase offers the possibility of significantly improving both the welding depth and the reproducibility of the spot weld quality and of avoiding the volume defects in the center of the nuggets that result from volume contraction during solidification. Consequently, RSW-joined dissimilar joints between modern, dissimilar aluminium alloys show great potential for industrial applications. However, a key factor for the feasibility of corresponding process strategies with dynamic increases in electrode force in the future is the capability and modernization of the system technology to be used, which is currently limiting, particularly with regard to rising times of the electrode force.
(Source: Welding And Cutting 2/2025 DOI: https://doi.org/10.53192/WAC202502139)
Schlagworte
AluminiumDissimilar AlloysDissimilar MaterialsJoiningResistance Spot WeldingRSWWelding


